
- This topic has 22 replies, 2 voices, and was last updated 4 years ago by

 20degree.
- AuthorPosts
Hi
I have notice in your quickstart video number 3 about scaling and extruding for bforartists version 1.
If i have understand? The first demonstration show a rectangle that extrude not equal. The other on the same video show an extrude that is proportional because of the “apply scale”. So if i’m correct, applying the scale before extruding, make the extruding equal in distance?
I wonder about the extruding. Here is the steps i do in BforArtists version 1.
1 – Create a cube model. Step 2 – Go into edit model. Step 3 – I press the keyboard letter (S = extrude) and (X = X axe). This make two identical cubes side by side.
The thing is that on the elements of the scene, i wander how to make apear in the element of the scene: Cube and Cube2 model?
Next thing suppose that one cube is the wheel of a car, extruding this cube to be the next wheel beside. Then how to extrude “both” individual cubes (at the same time) to make the 2 other wheels? Like 2 front cubes and 2 back cubes? So into the elements of the scene there is Cube, Cube2, Cube3 and Cube4.
Also i wander how to create these 4 aligned cubes, and that into the elements of the scene; there is only writen Cube once?
There is many things i experiment, but also try to explain “how to” to the peoples that ask me things.
Thank’s for your time.
I still continue to learn for my free pdf guide and already had comments about it.
A+
Hm, i am no friend of threads that covers all. Lots of questions just leads to lots of answers and makes the further discussion harder. But i’ll do my best to answer your questions.
So if i’m correct, applying the scale before extruding, make the extruding equal in distance?
Indeed. Since the scale factor is now 1 for every face again.
The thing is that on the elements of the scene, i wander how to make apear in the element of the scene: Cube and Cube2 model?
Sorry? I don’t understand your question 🙂
Next thing suppose that one cube is the wheel of a car, extruding this cube to be the next wheel beside. Then how to extrude “both” individual cubes (at the same time) to make the 2 other wheels? Like 2 front cubes and 2 back cubes? So into the elements of the scene there is Cube, Cube2, Cube3 and Cube4.
Hm, why do you want to extrude them out? Just duplicate them, and move them in place 🙂
Also i wander how to create these 4 aligned cubes, and that into the elements of the scene; there is only writen Cube once?
In Ram? There are some techniques that allows to work with internal instances. But even i would need to make some researches first. I never had a use for it.
Or do you mean to join the meshes into one? This is done with the Join command. See Object menu.
Or do you mean parenting? This is done with the parenting menu. See Object menu.
Kind regards
Reiner
This is my signature. You can change your signature in the profile
Thank’s for helping me once again.
I have updated my free pdf guide. The things ive added into is subdividing an edge into 2 edges or more edges. Subdividing a face. Welding and dissolving vertex points that share the same edges. Creating an edge with two vertex points.
I’m getting better bit by bit with BforArtists. It’s great that you make it more user friendly, with less keyboard keys shortcuts. Doing so you are on the right path, that’s great! Specialy that peoples like more user friendly softwares, with not much keyboard shortcut keys to do.
A+
Note, it takes years to learn all required tools and needed techniques. And you never stop learning. But making tutorials is a good way to learn 🙂
This is my signature. You can change your signature in the profile
Ive got to say that there are peoples on other forums that read and try the guide and give me some comments about it. Because of so i have changed some pages, they have make me notice things into some pages of the free pdf guide. So i learn and update the guide. I even think to maybe share it with some schools as a basic modeling “not official” free pdf guide about BforArtists. This should rise even more the popularity of BforArtists. Thank’s very much BFA-Reiner to help me explaining step by step things to do. You are a great person!
I wonder if there is some way to do a “not loop cut”, but a “select loop”. Like if i have a bottle made of a cylinder with some extrudings. Rather than circling around the model to click on some faces (shift-click) turning around the model for the model faces selected. If there is some “select loop tool” for selecting faces or edges that are all around the model?
A+
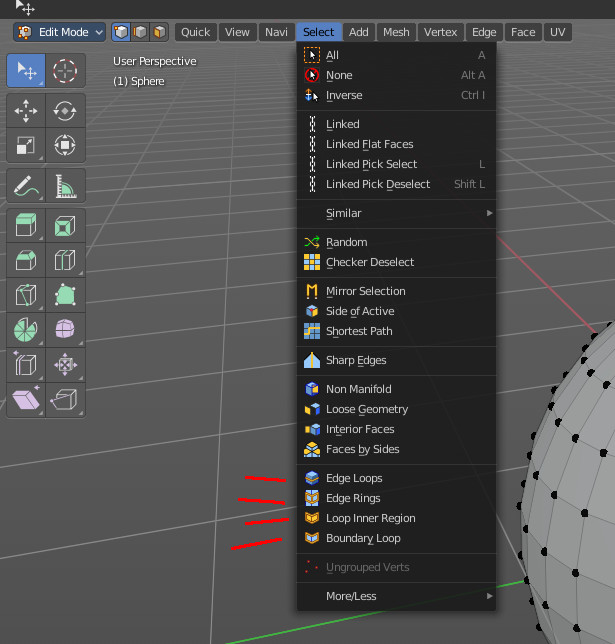
Hold down alt when clicking at an edge selects the loop. To select an edgeloop you need to be either in edge or vertice select mode. And when you are in face select mode and have a face selected then you can select a whole faceloop that way.
Have also a look at the Select menu. Here you can select edge rings and edge loops too. Plus two other methods.
Attachments:
This is my signature. You can change your signature in the profile
Thank’s ive added the select face loop with the Alt key into the free pdf guide. The free pdf guide is updated in the same shared link.
https://drive.google.com/open?id=17ANvDZvigt1y_UpNUBHhKyY2pZLu8HMr
I can say that already there is more then 3000 views. The peoples around the world have an urge for my teaching and my free pdf guides. That’s fantastic it will bring much more peoples into BforAritsts.
Now the thing i try to figure out is to make as this youtube video:
https://www.youtube.com/watch?v=MDvV5EVls1g
So that when peoples extrude faces from a cylinder, selected with the Alt key; they can make the extruded faces (divided or glued) together as the youtube video.
It’s the next thing i want to know passing from wireframe to normal, and from normal to wireframe. So i can do the same for BforArtists v1 and v2 into the pages of the guide (like the youtube video).
A+
This is Blender 2.79
This is my signature. You can change your signature in the profile
Thank’s for helping BFA-Reiner, i appreciate very much. Maybe for yourself it is not much needed that i tell you that i appreciate yourself very much, but for me it is very important to mention it. There are peoples around the world that dont appreciate peoples sadly, you know that it is true.
It’s been almost 2 month that have passed on a forum beside others that i’m onto, and there is near of 3500 views already about the free basic bforartists pdf guide. At this time the basic modeling guide has 39 pages and there will be more pages to come. Then next pages i intend to put is exporting the Pack Islands UV image, import in Gimp to creating a texture; then import in BforArtists for texturing the model.
A “suggestion”. It would be great even fantastic if into BforArtists v2 there would be some plugin function to export the Pack Islands Uv map image. So that it “auto-create” a PSD file for the popular Adobe Photoshop CS2 software and for Gimp version 2.10.12 (that i have). That the image file would create a layer for each faces zones. So like that the user just have to fill a layer forming the face zone, with Adobe Photoshop CS2 or Gimp. Then from one of these softwares export the PNG file to import into BforArtists. Yup it would be great this function to export the UV mapped texture, that auto-create a layer for each face zone; and export it for thoses softwares.
If you want you can take a look of what have been done of my free pdf guide, the url link is the same. I have just replaced (updated) with the new recent pdf file. It’s not finished the none official basic 3D modeling guide with BforArtists. It’s a good thing that you have givin me the press kit (images) that i used for the background design look of the pages i have created.
A+
Hey,
You can already export the UV layout as an image to continue the texture work in your favourite image software 🙂
Kind regards
Reiner
Attachments:
This is my signature. You can change your signature in the profile
I know that you can export the UV map from BforArtists thank’s to your fantastic Quickstart videos. But i dont see the option to export as PSD file, only PNG, EPS and SVG file.
The idea i have is that BforArtists export as a PSD file compatible with the very populars softwares as Adobe Photoshop CS2 and Gimp v2.10.
Here is the things:
With UV Mapping Smart UV Project and Pack Islands that arrange the faces on 1 texture image. It would be “amazing” that BforArtists could also export as PSD file with layers.
BforArtists would see each face that form the image. Each face would be positionnned on a layer for both popular softwares. Suppose that each face are a city on the glove, to modify the look of the city and not other city’s; each city is onto a layer. Also the face (city) is positionned on the layer, for not overlapping other city’s upper or under level.
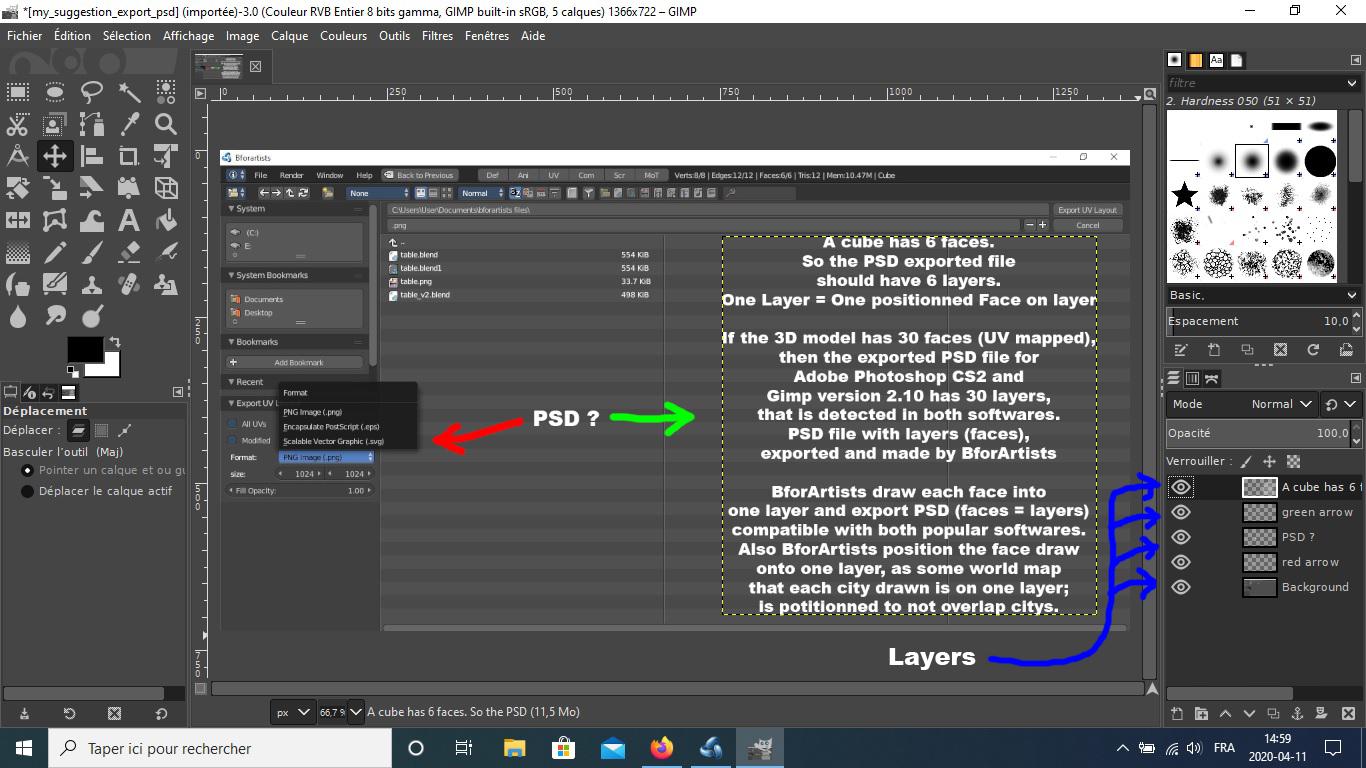
A cube has 6 faces. So when exported from BforArtists it create a psd file of 6 layers of the same size like (1024px by 1024px), but draw and position the face on the layer; as it look into the view of UV Mapping. So the face 1 of the cube is shown and drawn on one layer, with invisible-transparent space around (as png with transparency). Face 2 of the cube would be on an other layer that show only face 2. It is positioned also to not overlap face 1, face 3, face 4, face5 and face 6. The same goes for the other faces.
This could definetly speed up creating a texture with theses two very popular softwares. Because the user simply fill the zone where he/she see the texture (face) on a layer. Do the same with the other layers, then save and export there image for BforArtists.
Here is an image of what i mention of layers into Gimp with into the image some infos.

The idea i have is that BforArtists export as a PSD file compatible with the very populars softwares as Adobe Photoshop CS2 and Gimp v2.10.
You are welcome to implement it and submit a patch 🙂
I for myself keep my fingers away from this. Too complicated. And the very most software reads png. I also don’t see the need for layers here. You create them in your 2d software as you need them.
This is my signature. You can change your signature in the profile
I’m no expert in programming and lack many knowledges. But i have writen at:
I hope there will be many peoples that will help free for this idea of mine.
Well at leass, i try to bring more peoples interrest around the world into BforArtists
A+
I fear i wasn’t clear enough. I love your enthusiasm. But your feature request makes no sense at all, sorry. Even when you would be able to export to psd, you would still just export the picture of a wire. And the file format png is more than sufficient for that. It makes also no sense workflowwise to split your uv patches into layers. You would make yourself more work than you need to.
I do not recommend to post anything Bforartists related at the troll community Blender Artists. Even when this is the official Blender forum. They have once attacked me with all possible and impossible weapons when i started the fork. And discredited me as a pedophile, sex offender and rapist for no other reason than to stop me forking Blender and to stop others to join this project. In this regards they were even successful. Who wants to join a project that is under permanent attack …
This is my signature. You can change your signature in the profile
I have taken out the post from BlenderArtists, because you have writen they have in the past attacked you.
I find it sad that this has happened to you. I really want to help you, you know! Well i’m not perfect but i want the goodness for peoples. It is easy to judge peoples and be judged by others. But what is hard is to like and accept peoples as they are.
Me i have been judged many times, i’m sure into the future i will be judged again. But even so i do good things for peoples.
- AuthorPosts

- You must be logged in to reply to this topic.